Following on from previous post about creating an e-book, today we will make that “black on white” text look nicer and we will do it using CSS (Cascading Style Sheets).
I will not detail on what CSS is because this is not the purpose of this post. If you need to refresh your knowledge, please head over to W3School’s page.
Very shortly though, CSS helps HTML look nicer and it does so by defining how each HTML element should be displayed in a browser.
By now, we know that an e-book is basically HTML. Plain HTML documents can be read by most browsers in the same way, which is not the case about e-books. Because e-books can be read on e-readers, computers, tablets, phones etc., screen sizes will differ, same will font size, page width etc. With this in mind, we need to ensure that we use relative sizes and not sizes in pixel (PX); so we’ll use either percentage (%) or em (EM).
Quoting W3Schools: What is the difference between PX, EM and Percent?
Pixel is a static measurement, while percent and EM are relative measurements. The size of an EM or percent depends on its parent. If the text size of body is 16 pixels, then 150% or 1.5 EM will be 24 pixels (1.5 * 16). Look at CSS Units for more measurement units.
Again, very shortly, 1em equals to current device’s font size, 100%. 1.5em will be 150% of current font size. 2em will be 200%…, you got the idea.
Although we can add CSS properties and selectors inside .html file, we will create a separate .css file and will link it from .html file. This way, you can very easily use same CSS file as template for other books, instead of copy/pasting specific text from inside .html file.
OK, let’s open a blank notepad file and save it as epub.css in the same folder where mybook.html. Let’s add one additional line to our .html file so that it knows where to look for this .css file.
Right click mybook.html file and open it with notepad. Add one new line after and before
As mentioned previously, out of all HTML tags, we will use Headings and Paragraphs the most in any e-book, throughout the entire book. Let’s then start with defining Headings because we need them for Chapter titles and subtitles. Again, using CSS we can design our HTML to look awesome and each of you will have your own definition of awesome and, why not, design skills, which I surely lack.
Let’s say in our e-book we want Chapter Title to be 1) aligned to the right and 2) have an additional 2 free lines from the previous block of text. To accomplish all this, in our epub.css file we will write below code for h2:
[code language=”css”]
h2 {
text-align:right;
margin-top:2em;
}
[/code]
Save .css file and leave it open. Now open mybook.html in a browser. See how our Chapter Title changed from left to right and the space before and after it? Just to show you how easy it is to change something using CSS, let’s say we want Chapter Title to be in red… in epub.css add color:red; text on the next line after margin-top:2em;. Save the file and then refresh html file in your browser. Your title should now be in red.
Now think about it a little. What if you would have a book with hundreds of pages, with hundreds of Chapter Titles? With one line added the CSS file, you changed the look of all Chapter Titles. How cool is that?! Let your imagination flow and modify your CSS file as you wish to make your e-book look great!
Ok, before going on, let’s remove the line with red color, unless you want to leave it of course.
Regarding Chapter Subtitles, let’s say we want them also 1) right-aligned but 2) style should be italic. Below is the code to make this happen:
[code language=”css”]
h3 {
text-align:right;
font-style:italic;
}
[/code]
Regarding paragraphs, as you recall, I added 3 paragraphs in my .html file; I did this because I wanted to show you 3 different examples of paragraphs modified through CSS styles. So, let’s make all default paragraphs justified, first line indented by 2em, without any margins on left or right (because we want to use as much space as possible) but we do want to have a little bit of size before next paragraph starts. Here’s how we can accomplish this:
[code language=”css”]
p {
text-indent:2em;
text-align:justify;
margin:0em;
margin-bottom:0.25em;
}
[/code]
Next, we will also use a paragraph but with a purpose. For example, when we will want to quote something or add few lines of text that is totally different from other paragraphs etc. We’ll make it center aligned, italic and will add some space before and after so that it is visible and distinguished.
[code language=”css”]
p.quote {
text-align:center;
margin-top:0.5em;
margin-bottom:0.5em;
font-style:italic;
}
[/code]
In the above code you will notice a small addition to our CSS style. By adding p.quote, we’re just specifying that any paragraph with quote
class, should have these additional changes applied (for example, if we will not add text-align:center;, this paragraph will remain justified because this is what text-align for all paragraphs says).
If you’re more curious… similarly, if you will add only .quote for example, that means any HTML tag where you will add quote class will have those changes applied.
Seems easy and straightforward to me. Again, think about how easy you can modify an entire book?! You can take same .html file and only make changes in the CSS file to get a completely different book. Think about how easy you can create books for readers with low vision, blindness or visual impairments! Try and play with the menu from W3Schools and you’ll be amazed of what you can do with CSS.
For last paragraph mainly I want to make you interested in “what else can I do easily?”. Let’s modify only first paragraph in any chapter so that it has a visual delimiter from Chapter Subtitle.
[code language=”css”]
p.first {
margin-top:1em;
}
[/code]
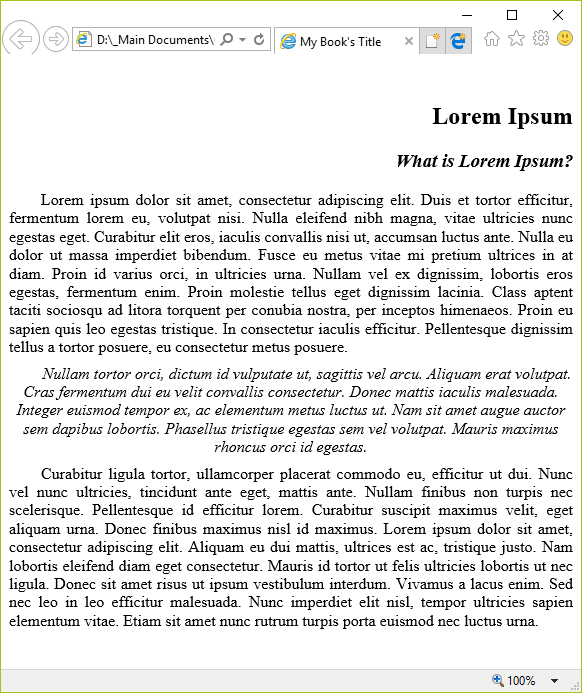
At this point, I have defined my 3 paragraphs like this: First is first obviously; Second is a quotation-like and Third is just a normal paragraph. Here is my html code inside
tags (I’ve cut the text in code to make it shorter but it is visible in the screenshot in its full width):[code language=”html”]
Lorem Ipsum
What is Lorem Ipsum?
Lorem ipsum dolor sit amet, consectetur adipiscing elit.
Nullam tortor orci, dictum id vulputate ut, sagittis vel arcu.
Curabitur ligula tortor, ullamcorper placerat commodo eu, efficitur ut dui.
[/code]Here’s my webpage in IE: