As explained in Ok, E-Books post, this topic became of an interest just recently. I have never created an e-book so you will not see me saying that I’m usually doing it this way or that way or other crap like this. No, cards on the table. I’m just as curious as you are about e-books; I read quite a few online articles and even bought an e-book about how to create an e-book…
Following that book I was able to turn one of my procedure document from work into a fully working e-book. I uploaded it to Amazon’s Kindle Direct Publishing and it din’t complain at all. At KDP I reached the step where I could download a sample bookfile to see how it will look like. So, it works. fine In these series of posts, I’m just trying to put down the steps needed to create a simple e-book in .epub format. You’ll be free to further enhance it as much as your design and HTML skills are.
Just so this is clear from the beginning, an e-book is just a transformed XHTML, CSS and XML files. Because few people may not know what XHTML is, I quickly wrote HTML vs XHTML post yesterday. Regarding XML, I will show you later what it is for and how to create it.
Before we start, I’d like to tell those few basic HTML tags that we will use. I want you to understand them, not just using them blindly.
- Headings are defined with the to tags, with being the biggest heading and the smallest. Headings are really-really important because they will define your book’s Table of Contents. We will not use for Book Title mainly because we don’t need Book Title in the Table of Contents; we will use for Chapter Titles and for Chapter Subtitles.
- A paragraph is defined using tag only. We’ll see later how we can have differently formatted paragraphs using CSS.
- We will also use tag for other HTML elements, specifically when we will want to define specific blocks or divisions of text.
- We will also use CSS a lot to format different blocks of text and images.
With that said, let’s get started.
First and foremost, you need to write something. An article, a novel, something. Or take any document that you can test with. Format doesn’t matter now, it can be a text file, word file, anything.
Again, we’ll use XHTML Strict so our html file will be well formatted. Initial code is nothing fancy, just basic html code. Copy below code to a notepad file and save it as mybook.html in a new folder [leave notepad file open]. Below is what I have so far in my file. Note that I added “My Book’s Title” as a page title, see line 7.
[code language=”html” highlight=”7″]
My Book’s Title [/code]Suppose you have your manuscript by hand. To start with, copy the contents of one chapter only and paste it exactly inside the tag. Save the file.
[code language=”html”]
Paste your first Chapter here. [/code]Go to the folder where you have mybook.html file and double click it so that it opens in your default browser.
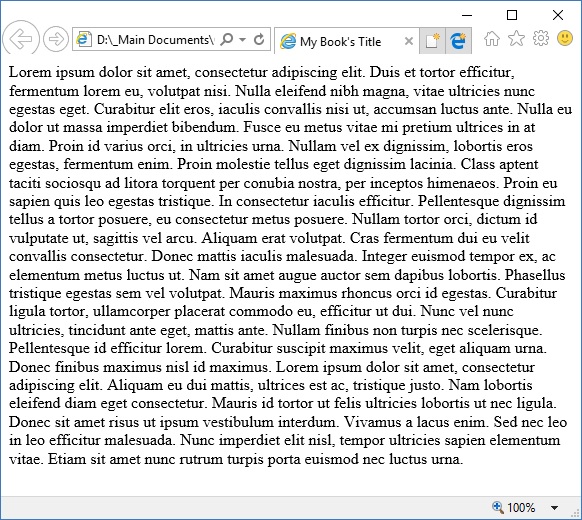
For testing purposes, I used www.lipsum.com website to generate 3 paragraphs of dummy text. I placed this text inside the tag and saved the file. If I run mybook.html now, my browser will show nothing except clear text; no breaks, no new lines, nothing.
 This is because we need to tellour browser where to start a new line, a new paragraph, where to put a heading and so on. This is done using tags described in the beginning.
Next, we’ll add your chapter’s title and paragraphs. Going back to your notepad file, right where your chapter title begins, add tag. Where your chapter title ends, add . Backslash key is to tell the browser that here we are closing the previously opened tag, in our case.
. Do the same for all other paragraphs you have. Save the file and run it again in your browser. Looks nicer, isn’t it? Here’s what I have:
Now, if you have chapter subtitles, do something similar. Right before your chapter subtitle starts, add tag. Where your chapter subtitle ends, add .
Similarly, where your paragraph starts, add tag. Where your paragraph ends, close the tag with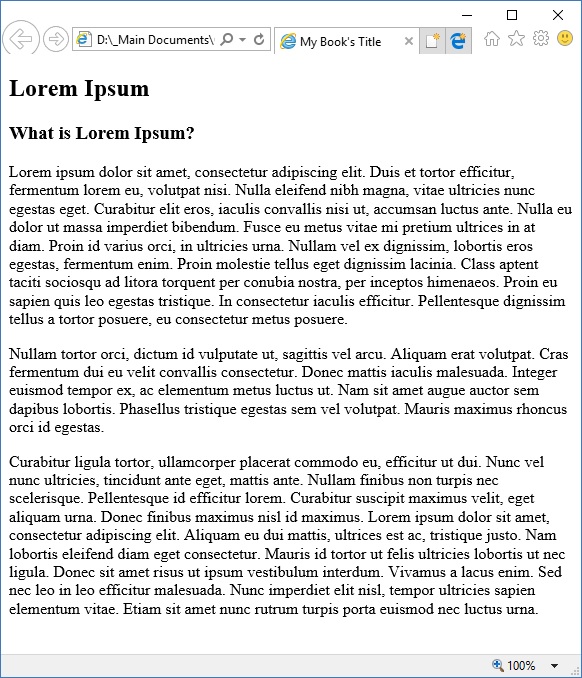 As you can see, there seems to be a default space between chapter title, subtitle and the paragraphs. Also, everything is left centered and there are no other formatted elements. This is what we will work on in the next post.