This post assumes you have created a reference computer and captured an image of it as described in the previous post.
Import and configure a task sequence to deploy the target computer
After the task sequence to deploy the reference computer (Home-XPSP3-Ref01) finishes, a captured image of the reference computer is stored in \Home-SCCMCaptures$Home-XPSP3-Ref01.wim. Now, We’ll create a task sequence that will deploy the captured image of reference computer to the target computer (Home-XPSP3-Tar01).
Create an MDT 2008 Task Sequence for the Target Computer
To create a task sequence to deploy the captured image to the target computer:
- Click Start, point to All Programs, and then point to Microsoft System Center. Point to Configuration Manager 2007, and then click ConfigMgr Console.
- In the Configuration Manager console console tree, go to Site Database/Computer Management/Task Sequences.
- In the details pane, click Import Microsoft Deployment Task Sequence.
- The Import Microsoft Deployment Task Sequence Wizard starts.
- Complete the Import Microsoft Deployment Task Sequence Wizard by using the information in the table below. Accept the default values unless otherwise specified
| On this wizard page | Select Client Task Sequence, and then click Next. |
| General | In Task sequence name, type Windows XP SP3 Target Deployment. In Task sequence comments, type Task sequence for deploying captured reference computer image to the target computer (Home-XPSP3-Tar01), and then click Next. |
| Details | Click Join a domain. In Workgroup, type Home.local. In User name, type Work User. In Organization name, type Work Organization. In Product key, type product_key (where product_key is the product key for Windows XP SP3). In Capture destination, type \Home-SCCMCaptures$Home-XPSP3-Ref01.wim. In Capture Account, click Set, and then complete the Windows User Account dialog box by performing the following steps:
Click Next. |
| Boot Image | In Specify an existing boot image package, click Browse. In Select a package dialog box, click Windows PE Custom, and then click OK. Click Next. |
| MDT Package | In Specify an existing Microsoft Deployment Toolkit Files package, click Browse. In the Select a Package dialog box, click MDT 2008 Files, and then click OK. Click Next. |
| MDT Package: MDT Details | In Name, type MDT 2008 Files. In Version, type 1.00. In Comments, type Provides access to MDT 2008 software during Configuration Manager deployment process, and then click Next. |
| OS Image | Click Create a new OS image. In OS image file (WIM) location, type \Home-SCCMCaptures$Home-XPSP3-Ref01.wim. In Package source folder to be created, type \Home-SCCMPackages$Home-XPSP3-Ref01_Image. Click Next. |
| OS Image: Image Details | In Name, type Windows XP SP3 Reference Image. In Version, type 1.00. In Comments, type Windows XP SP3 captured image of reference computer (Home-XPSP3-Ref01) used to deploy to target computers, and then click Next. |
| Client Package | In Specify an existing ConfigMgr client package, click Browse. In the Select a Package dialog box, click Configuration Manager Client Upgrade, and then click OK. Click Next. |
| USMT Package | In Specify an existing USMT package, click Browse. In the Select a Package dialog box, click USMT, and then click OK. Click Next. |
| Settings Package | Click Create a new settings package. In Package source folder to be created, type \Home-SCCMPackages$CustomSettings_Target, and then click Next. |
| Settings Package: Settings Details | In Name, type MDT 2008 Target Computer Custom Settings. In Version, type 1.00. In Comments, type Configuration settings for MDT 2008 deployment process (such as CustomSettings.ini) for the target computer, and then click Next. |
| Sysprep Package | In Specify an existing Sysprep package, click Browse. In the Select a Package dialog box, click Configuration Windows XP SP3 Sysprep, and then click OK. Click Next. |
| Summary | Displays a status bar that shows the progress of the tasks defined in the wizard. The Import Microsoft Deployment Task Sequence Wizard closes when the task sequence is imported. |
Customize the target computer task sequence
By default, the task sequence sets the password for the local Administrator account to a random value. At this step we will specify the password we want.
To customize the Windows Vista Target Deployment task sequence:
- In the Configuration Manager console console tree, go to Site Database/Computer Management/Operating System Deployment/Task Sequences.
- In the details pane, click Windows XP SP3 Target Deployment.
- In the details pane, click Edit.
- In the Windows XP SP3 Reference Deployment Task Sequence Editor dialog box, go to PostInstall/Apply Windows Settings.
- On the Properties tab, click Enable the account and specify the local administrator password.
- On the Properties tab, in Password and Confirm Password, type P@ssw0rd, and then click Apply.
Select distribution point for packages and images
Running the Import Microsoft Deployment Task Sequence Wizard to create the task sequence for the target computers, creates a new software distribution package and a new image.
To select the distribution points for software distribution package:
- In the Configuration Manager console console tree, go to System Center Configuration Manager/Site Database/Computer Management/Software Distribution/Packages.
- In the details pane, click MDT 2008 Target Computer Custom Settings.
- In the details pane, click Manage Distribution Points.
- The Manage Distribution Points Wizard starts.
- Complete the Manage Distribution Points Wizard by using the information in the table below. Accept the default values unless otherwise specified.
| On this wizard page | Do this |
| Welcome | Click Next. |
| Select Destination Distribution Point | Click Next. |
| Package | In Distribution points, select HOME-SCCM, and then click Next. |
| Completion | Click Next. |
| Wizard Completed | Click Close. |
To select the distribution points for operating system images:
- In the Configuration Manager console console tree, go to System Center Configuration Manager/Site Database/Computer Management/Operating System Deployment/Operating System Images.
- In the details pane, click Windows XP SP3 Reference Image.
- In the details pane, click Manage Distribution Points.
- The Manage Distribution Points Wizard starts.
- Complete the Manage Distribution Points Wizard by using the information in the table below. Accept the default values unless otherwise specified.
| On this wizard page | Do this |
| Welcome | Click Next. |
| Select Destination Distribution Point | Click Next. |
| Package | In Distribution points, select HOME-SCCM, and then click Next. |
| Completion | Click Next. |
| Wizard Completed | Click Close. |
Deploy the captured image of the reference computer to the target computer
Create an advertisement for the target computer task sequence
To create an advertisement for the task sequence:
- In the Configuration Manager console console tree, go to System Center Configuration Manager/Site Database/Computer Management/Operating System Deployment/Task Sequences.
- In the details pane, click Windows XP SP3 Target Deployment.
- In the details pane, click Advertise.
- The New Advertisement Wizard starts.
- Complete the Manage Distribution Points Wizard by using the information in the table below. Accept the default values unless otherwise specified.
| On this wizard page | Do this |
| General | In Comment, type Advertisement to deploy Windows XP SP3 reference image. In Collection, click Browse. In the Browse Collection dialog box, click All Unknown Computers, and then click OK. Select the Make this task sequence available to boot media and PXE check box. Click Next. |
| Schedule | Click Next. |
| Distribution Point | Click Next. |
| Interaction | Click Next. |
| Security | Click Next. |
| Summary | Click Next. |
| Confirmation | Click Close. |
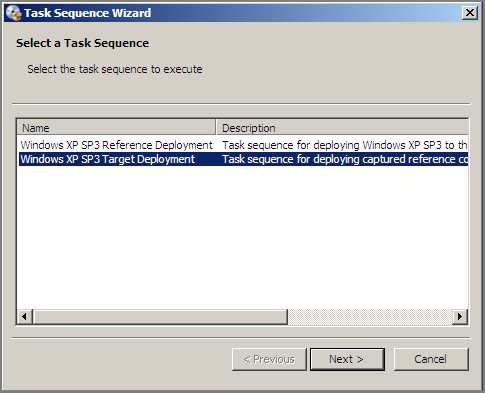
Now, we can boot Home-XPSP3-Tar01 computer from the ConfigMgr2007_TS_Boot_Media.iso file created earlier.
On the Welcome to the Task Sequence Wizard page, in the Password field type P@ssw0rd and press Next. You will see that there are two assignments: Windows XP SP3 Reference Deployment and Windows XP SP3 Target Deployment. Select Windows XP SP3 Target Deployment and click Next to start the operating system deployment.
The operating system deployment starts. If any problems occur during the deployment, consult the MDT 2008 document or learn how to troubleshoot task sequence issues in Configuration Manager.
And that was the simplest way (and with any configuration made to the operating system) to make an image of a reference computer and then use that image to deploy target computers.